The Ultimate Guide to Obtaining Temporary Residency in Mexico
Do you want to move to Mexico legally? Here is the ultimate guide to obtaining temporary residency in Mexico. We make it easy.
We just completed the process for obtaining our temporary residency in Mexico (all during a pandemic). Overall, the process is fairly easy, however, it can be a little intimidating. There is also a lot of information out there. To avoid confusion, we have created a guide for the entire process! This post focuses on the process in Mexico.
This guide is broken down into the steps required after you enter Mexico. We also include all the relevant links to the required documentation and explain how to fill out the forms.
First, you start the temporary residency process in your home country. For us, that is Canada. If you are starting at this point, check out How to Apply for Mexican Temporary Residency During Covid-19.
Obtaining Temporary Residency in Mexico
Here is a high level flow of the process after you receive pre-approval from the consulate in your country.
- After pre-approval, you have 6 months (180 days) to enter Mexico.
- At the Mexican border, your FMM is stamped “Canje”. (This is very important!) Your visa sticker in your passport is only good for one entry into Mexico.
- After entering Mexico, you have 30 calendar days to report to the INM.
- Present yourself to the INM with the applicable forms and photos (possibly optional – read on for more details).
- Return to the INM to collect your temporary residency card.
1. Entering Mexico with pre-approval visa sticker
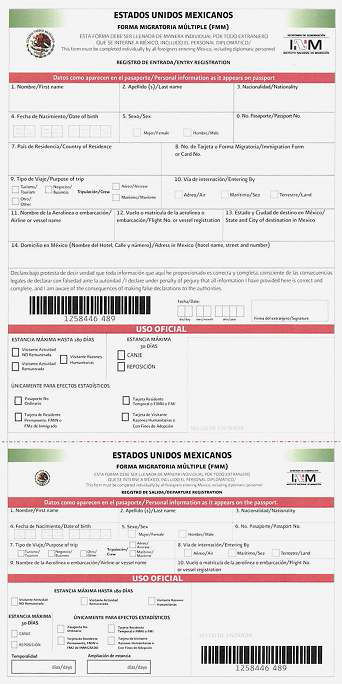
After receiving pre-approval from the consulate, you will have a visa sticker placed in your passport. When you entering Mexico, you present your passport and fill out an FMM (Forma Migratoria Múltiple).
You can complete the FMM online, pay for it and print it (bring a copy of the receipt). We did not do this and just filled it out at the border.
Instead of checking off the boxes for tourist, the crossing official will check off “Canje”. This selection is under “Estancia Máxima 30 Días” in the bottom section for Official Use. The official will stamp your FMM and the sticker in your passport. Now you have 30 days to present yourself at the INM (National Institute of Migration) (Instituto Nacional de Migración).
2. Before presenting yourself at the INM
Prior to presenting yourself at the INM, there are a couple of forms that have to be filled out.
Trámite form
The trámite (Formato para solicitar trámite migratorio de estancia) is the first form you complete. This form for requesting the processing of your immigration paperwork. It also lets the INM know why you are coming and what you need to do.
Complete the form online, print one copy, sign the document, then make a copy for the INM. Choose an email address you check regularly. The INM will send you updates to your residency status through this email.
Here is how you fill out the form:
- Q1: ¿Qué deseas hacer? / What do you want to do?
- Canjear o reponer documento migratorio
- Q2: Especifica / Specifies
- Canje de FMM por Tarjeta de Visitante o de Residente
In the next parts, you do not have to fill out any box that does not have an asterisk (*) beside it (for example the CURP). Make sure that these sections match your passport. For your address, if you do not have a permanent address yet (like an apartment), note that you will have to complete an address change form later.
Protip: translate the page from Spanish to English to make filling the form out easier.
After filling out the form, click “Guardar” at the bottom.
Print the completed form, sign it and present it to the INM.
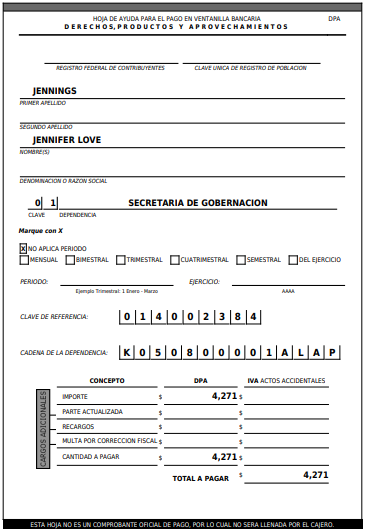
Pago de Derechos / Payment of Rights
The next step is paying your fees. You pay for your temporary residency before going to the INM. Complete the form online and print a copy for the bank.
Currently, the cost for issuing a temporary residency immigration document (for one year) is $4271.00 MXN or approximately $212 USD.
Take this form to the bank to pay the fee. You will present your passport to the bank teller as well so make sure you bring it.
Here is the link: https://www.inm.gob.mx/gobmx/derechos/
Here is how you fill out the form:
- Q1: Tipo de persona / Type of person
- Física / Physical
- (Moral is for a group of people)
Like the trámite, in the next section you do not have to fill out any box that does not have an asterisk (*) beside it. Here you just fill out your last name (primer apellido) and your first names (nombre(s)). Click “Continuar”.
- Q2: Tipo de trámite o servicio / Type of procedure or service
- Derecho de Residente Temporal (DRT)
- Q3: Trámite / Processing
- Por la recepción, estudio de la solicitud y, en su caso, la expedición del documento migratorio que acredita la condición de estancia de Residente Temporal. Hasta uno año (DRT).
- You pay for your temporary residency in one year increments (unless you have special permission otherwise).
- Q4: Estado / State
- Choose the state where you are going.
- We chose Baja California Sur.
- Q5: Lugar donde se realiza el tramite o se presta el servicio / Place where the process is carried out or the service is provided
- Choose the city.
- We chose La Paz, B.C.S.
On the next page, you will be given a reference number and the amount you need to pay. Click “Imprimir” to print the document.
Take this completed form to the bank. We went to Citibanamex and paid cash.
Formato Básico
The next form you have to fill out is the formato básico. This form is filled out in Spanish. If you speak Spanish or have access to Google Translate, then it is pretty straight forward. There are a couple sections that may require some clarification.
Print a copy, fill out the form completely (en español), sign the document, then make a copy for the INM.
Here is the link: http://www.inm.gob.mx/static/vun_tramites/Formato_basico.pdf
Here is how you fill out the form:
- S1: Datos Personales / Personal Information
- Enter your basic personal information
- S2: Pasaporte o documento con el que se identifica el extranjero / Passport or document with which the foreigner is identified
- Enter the type of document you are using and the document number
- S3: Datos complementarios / Supplementary data
- Enter your highest level of education and area of expertise, do you speak Spanish, number of children, religion, and the streets where your residence in Mexico is
- S4: Media feliación / Half affiliation
- Enter your height, weight, skin color, and any tattoos or other markings
- S5: Lugar de procedencia / Place of origin
- Enter the country, province/state, and city where you are coming from
- “Estado, provincia, departamento o distrito” is your province/state again
- S6: Para menores de edad / For minors
- Enter the fields for this section if the applicant is a minor
- S7: Actividad en su país de residencia / Activity in your country of residence
- This section is for what you did for work in your country of residence
- Here is an example:

- S8: Actividad en México / Activity in Mexico
- Remember that a temporary residency does not give you permission to work in Mexico. This is not a work permit. You are not supposed to be working in Mexico
- Be careful what you put in this section. Indicating that you work online could confuse the immigration officials and give you problems
- Here is what we put:

- S9: Solo para trabajadores fronterizos / Only for border workers
- This section is for border workers only.
- Leave blank (unless applicable)
Sign the form and make a copy for the INM. The accepted date format for Mexico is DD-MM-YYYY.
Checklist for going to the INM
Before you head to the INM for your temporary residency in Mexico, check this checklist to make sure you have everything.
Here are the requirements from the Government of Mexico. I break it all down below of what you actually need and what we did.
- Trámite – filled out online, print, sign, bring a copy.
- Pago de Derechos – filled out online, print, pay fees at the bank. The bank will give you a receipt which you need to bring.
- Formato Básico – print, fill out completely, bring a copy.
- Passport – original and color copy.
- Valid visa issued by the consulate – original (in your passport) and a color copy.
- Valid and current FMM – original (half from the border crossing official) and a copy.
- Three photographs with these specifications:
- Size 2.5×3.0 cm, two front and one right profile, white background, ears uncovered, no earrings or glasses.
- Note about pictures: we brought photos to the INM but they did not accept them. Instead, the INM took our photos.
3. Presenting yourself at the INM (first visit)
So once you have all your documents, copies, photographs, and fees paid, it is time to present yourself at the INM. Remember, once you enter Mexico, you only have 30 calendar days to present yourself.
We completed this part of the process at the INM in La Paz. Due to the global pandemic, the INM had different hours – check with your local office. Our office was opened Monday to Thursday from 9:00 am until 1:00 pm. We showed up at 8:30 am to mitigate any long lines.
Once the office was opened, we signed into a log book, a security officer took our temperature and provided hand sanitizer. We then took a number and waited in the waiting area. The wait was only 5-10 minutes.
We crossed the border on October 08 and presented ourselves to the INM on November 03.
Activities at the INM office
When the INM officer called our number, we told them that we were completing the process for our temporary residency. We then presented all our documents and copies. There was very minimal chatting and the officer did not ask us any questions.
While we brought copies of everything, the officer actually made his own copies and gave us our copies back. Bring the copies anyways!
After reviewing and inputting all our documents, we were instructed to sit down until our names were called.
Finger prints & photographs
After a short wait, we were called up individually to do fingerprints and photographs.
The La Paz office has a digital finger print scanner. You scan your four fingers on your right hand first, then your left hand, and then both your thumbs together.
After finger printing, the officer took photographs. They brought out a white background and took a front and right profile picture. Side note: I had earrings in and no one said anything.
More documents
During the temporary residency application visit, we signed a couple of forms. We were given copies of these documents.
The officer gave us a “Comprobante de Registro de Solicitud” or Application Registration Voucher. This form has a “número único de trámite (NUT)” on it which is a unique processing number. This is basically your reference number for the temporary residency process.
The second document we left with is a letter basically stating that we were applying for temporary residency. The subject line is “Expedición de documento migratioro por canje” or “Issuance of immigration document for exchange”. On the back of this letter is the reference numbers and it is signed by the applicant and officer.
The third document is another receipt or certificate with applicable reference numbers.
Finally, the officer told us that the process would be complete in 10 to 15 days and to return at that time. All further communication is sent via email.
4. Getting our temporary residency cards
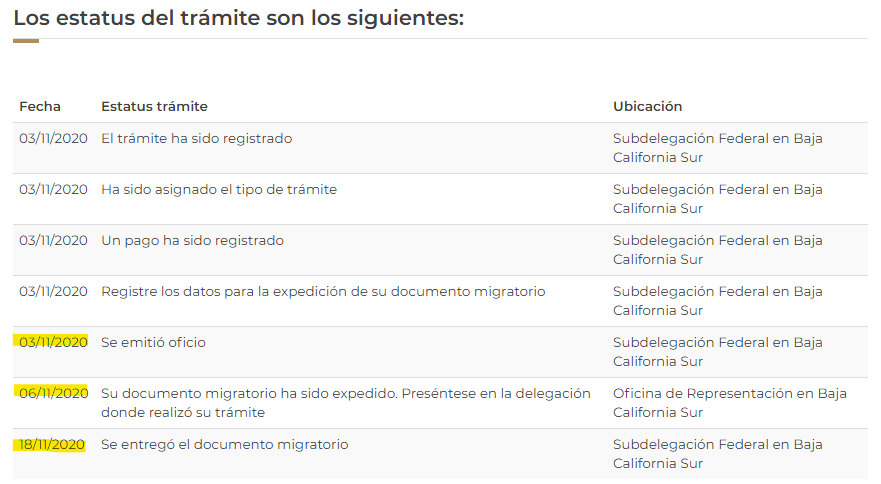
So after all of that, we waited about 10 days before checking the online portal. You are sent an ID number and password in an email before you even leave the INM office.
In reality, we did not need to wait 10 days! Our temporary residency was completed in 3 days!! The entire process from start to finish took 15 days.
We returned to the INM office to finish the process of applying for temporary residency in Mexico. This time, we did not arrive early in the morning. There was a very short wait and we were first in line after the people already being helped.
Unfortunately, we did not bring our file folder of all our documents with us. So when the INM officer asked for our reference numbers, we did not have them readily available. Don’t be like us. Bring your paperwork.
Luckily, the officer was able to pull up our applications by our last names and passports. She then asked us to sit down for a couple of minutes.
We were promptly called back up and handed our temporary residency cards!

Overall, the process for applying for temporary residency in Mexico is easy. While some may opt to have a lawyer help, you certainly can do it on your own. With this Ultimate Guide to Obtaining Temporary Residency in Mexico, you can certainly complete the process on your own!!
We started the process on November 03 and had our cards in hand on November 18. The application was finalized on Mexico’s side in just 3 days.
OTHER POSTS YOU MIGHT LIKE
- Ultimate Guide to Driving Down the Baja Peninsula
- How to Apply for Mexican Temporary Residency During Covid-19
- Smooth Sailing RV Trip To Mexico (Find Out How Much it Really Cost)
Have comments or questions about applying for temporary residency in Mexico? Think there is something we should add? Tell us below in the comments!
Like and follow us on Instagram for daily content.
SHARING IS CARING